What exactly is a DNS?
Computers and Smartphones can only understand numbers – people need memorable names. Who could ever remember 104.112.254.165? That’s the IP address for Amazon. Now imagine remembering the IP addresses of all the other websites you visit every day!
To solve this issue, Domain Name Systems (DNS) translates domain names into numeric IP addresses for you.
Whether you’re browsing from home or your smartphone, your ISP (Internet Service Provider – e.g. Converge) provides the DNS for you. After your web browser sends out a domain name to the DNS server, it then checks for the right numerical address and sends you there.
If it’s a popular domain (e.g. Facebook or YouTube) the DNS information stays stored so you can access it faster. Everything happens behind the scenes. Without DNS servers you really wouldn’t be able to use the internet very easily.
Why do your DNS settings matter?
It is clear that a DNS is essential to what you do online (as explained above). Any issues with it can and do affect your online experience. This is where you can run into problems with ISP-supplied DNS servers, such as the pre-installed Converge DNS servers you get when you have your internet supplied by Converge ICT.
A misconfigured DNS server can equate to slow internet performance. Not only that, but do you trust Converge ICT (or any other ISP) not to have control systems in place that block out parts of the internet? In the same way, Converge ICT (and every other ISP on the planet) can see every site you visit when you use their DNS servers!
Hackers can also target popular local DNS systems to perpetrate DNS cache poisoning, hijacking, and other attacks. Most ISPs (including Converge ICT) simply do not invest enough to protect users, because that eats-into their profits. If you care about privacy, security, and performance, your choice of DNS server does matter.
How to change your Converge DNS settings
As an Internet Service Provider (ISP) Converge ICT want all your internet traffic (and history) to be routed through them. No thank you! Therefore, they make it inconvenient to change your DNS settings. I say “inconvenient” as it’s straightforward to change your Converge DNS settings if you follow these simple steps:
Converge use Huawei Routers
An internet “Router” is the white box connected to the internet cable going into your home. It’s that ‘thingy’ that produces WiFi around your home and you can plug stuff into it too to connect to the internet. It looks like this (or similar white box full of wizardry):
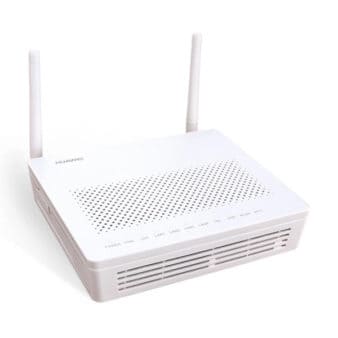
Converge Huawei Router Factory Settings
Now then, your friendly Converge installer probably gave you the ‘address’ of the router (so you can login to it and talk to it). This enables you to access things like the 2.4g/5g WiFi settings and change your WiFi passwords for your home. Obviously this is important unless you are particularly generous and want a WiFi setup that doesn’t need a password and you want all the neighbours sitting outside your house piggybacking the FREE internet you’re providing! No? I didn’t think so…
To login to your Router you type in the Routers “address” into your internet browser (that’s Chrome, Safari etc.) and a login page appears where you can enter the username and password the Converge guy gave you*. The address will be something like: 192.168.100.1 and the login page will look like this:
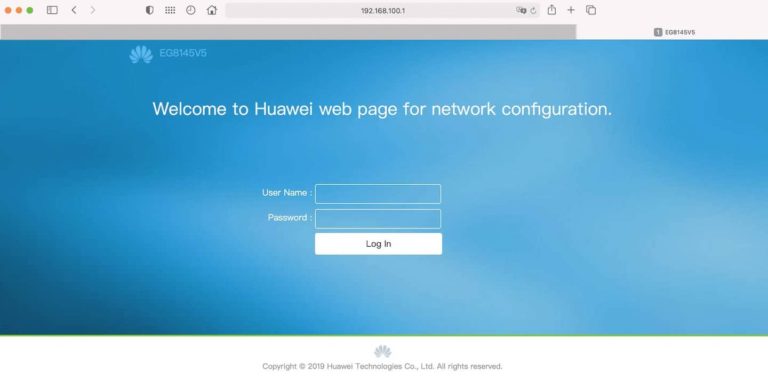
* If you were not given any Router login details, take a look under your Huawei Router for the Model Number (Tip: Take a photo of the Router info on your smartphone and make the image bigger so you can read the tiny print!) You can then easily look up your Huawei Router “Default IP Address” (third column) HERE.
Do NOT use the Factory login details!
If you were given Router login details by your Converge engineer (e.g. Username: Root, Password: Admin) then like may ISPs the engineer will have given you the Standard Admin login details (to change stuff like your WiFi passwords) but this is not a “Super Admin” login.
The magic happens when you login as a Super Admin!
If you try to change the Converge Router DNS settings as an “admin” you cannot. Where you enter the settings will be greyed-out. However, if you login as a “Super Admin” you can change/input the DNS settings. Bingo!
How to login to Converge Huawei Router as a Super Admin
Here’s a screenshot of the login information you enter to login to your Converge Huawei Router as a Super Admin (note the alternative in some instances):
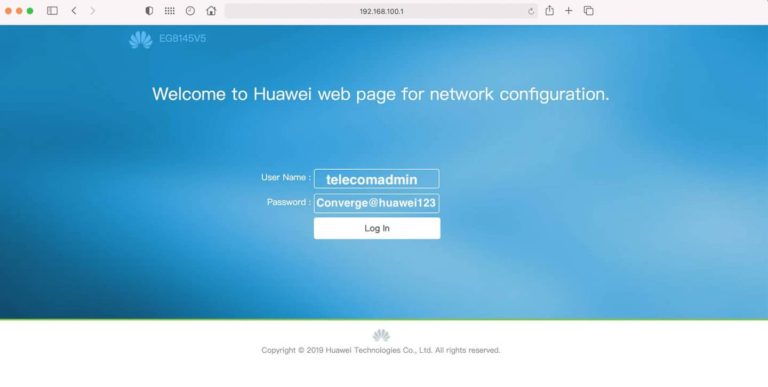
Step Two
Once you have successfully logged-in as a Super Admin, the Router Admin Panel will look like this. (If you have ever logged-in as a Standard Admin previously, then it will look exactly the same, but you now have FULL access!) Click on the “Advanced Tab”.
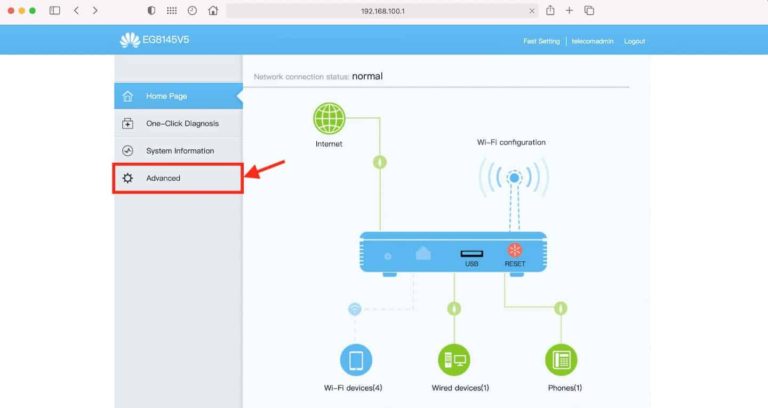
Step Three
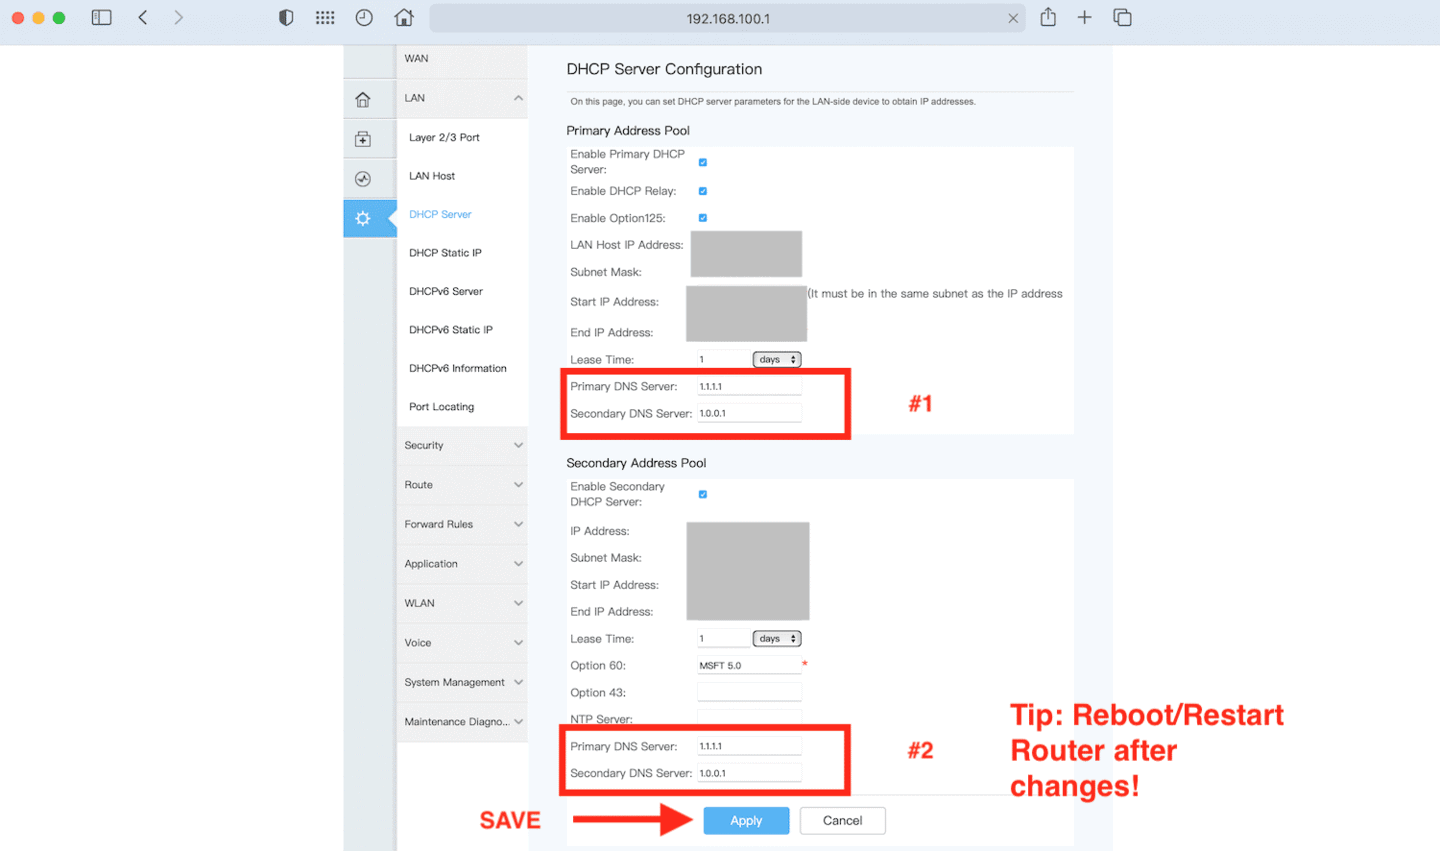
Under the “Advanced” Settings, Click on (1) LAN and then (2) DHCP Server. This page will look pretty intimidating to most, but please don’t be put-off. Ignore everything on the page apart from the DNS settings, which will likely be empty as they default to the Converge DNS system, which we want to change for all the reasons stated previously.
What DNS settings should you use?
To circumvent Converge DNS and use a faster, more private DNS you basically have three options (they are all Free to use):
- i. Cloudflare DNS : 1.1.1.1 , 1.0.0.1
- ii. OpenDNS : 208.67.222.222 , 208.67.220.220
- iii. Google DNS : 8.8.8.8 , 8.8.4.4
All three are excellent choices, however I use Cloudflare DNS as their technology is more advanced than OpenDNS (no space) and there’s no way I trust Google not to snoop! Further reading for Geeks HERE.
If you want to use Cloudfalre DNS too, then just look at the screenshot (above) on what to type into the settings boxes, being careful to include the “.” where applicable but not after the last number! The same applies to other DNS settings you may prefer to use from either OpenDNS or Google DNS.
You need to enter TWO sets of numbers TWICE and then click APPLY. This will save the changes. To double-check all is good, go back to the Router Homepage (little House icon) then retrace your steps ADVANCED – LAN – DHCP SERVER and you should see the new DNS Server settings have been preserved/saved.
As per the screenshot in Step Three, once you have checked the DNS settings have been saved you need to reset/restart the Router for the settings to take immediate effect. You can do a “Reset” from the Router Homepage or turn off your Router at the switch on the back, count to 10 slowly, then turn it back on again. You’re now all set and good to go.
All devices that connect to your Router via WiFi or Ethernet cable will now “talk” with the new DNS servers, not Converge ICT!
Please Note
Changing your DNS settings is a highly advisable thing to do for security purposes and to stop the possibility of Converge storing information on the websites you visit, your browsing history and (quite possibly) any information or comments you make.
However, changing your DNS settings is only the first recommended step individuals should take to speed up their internet connection a bit and circumvent any Converge data harvesting they may do (mainly for marketing purposes).
These steps enable you to bypass Converge, they do not encrypt your connection, enable you to watch Geographically locked content (e.g. Netflix UK or BBC iPlayer) or give you maximum online security.
Changing your DNS settings is a great first step, but for more protection & freedom, do yourself a huge favour and also read these articles too, for added online security and happy viewing 🙂

Recommended reading:
Ultimate Guide to Credit Card & Online Security
